方案说明
◆ 由于 CI/CD 的非持续运行而运行期间又需要较高系统资源的特性,符合 ACK Serverless 按资源使用时间计费的场景,降低 CI/CD 成本的同时又能提高并行多任务的执行效率。
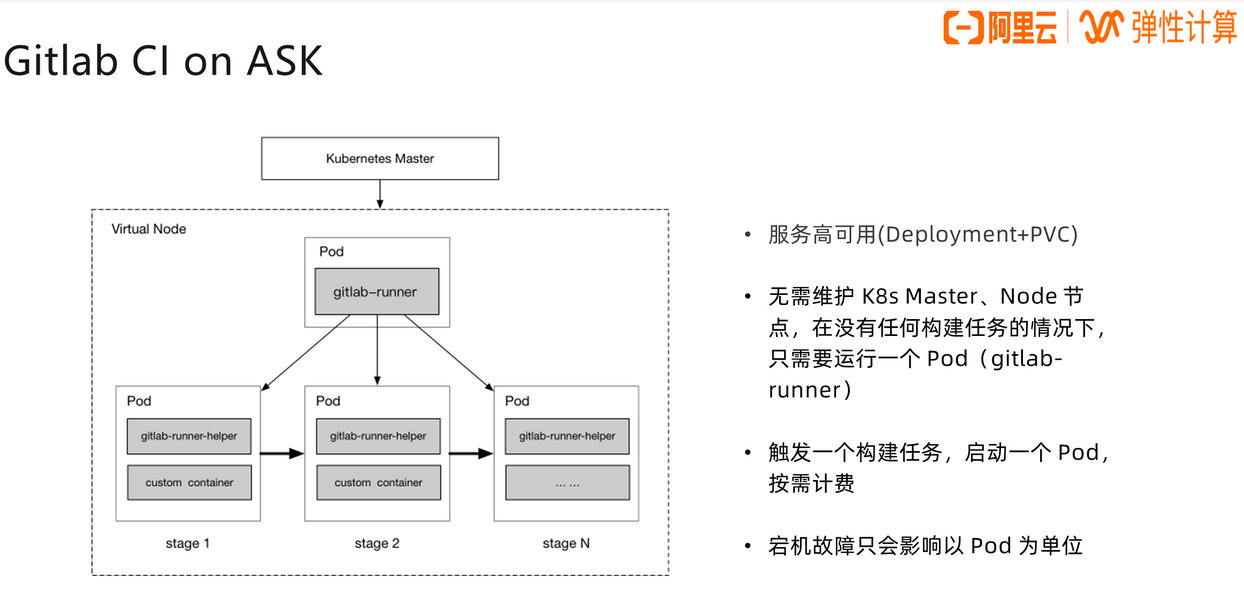
◆ 方案的系统结构与流程如下面来自参考文档[1]的截图,当没有任务时仅 gitlab-runner 作为一个 pod 始终运行,以随时接受来自 gitlab 的任务分配。当有任务需要执行时,针对每个任务创建一个 kubernetes executor 类型的 pod 执行任务,且任务执行结束后,这些 kubernetes executor 类型的 pod 会自动销毁。
步骤
准备 ACK Serverless 集群环境
● 在阿里云工作台页面创建 ACK Serverless 类型的 kubernetes 集群。
● 根据"集群信息"中的"连接信息",配置本地 kubectl,使可以在本地 kubectl 上对集群做操作。
准备配置文件
◇ 从 GitHub 上 clone 由参考文档[1]提供的配置文件样例到本地,使用其中"eci-gitlab-runner"文件夹里的配置文件。
◇ 以下配置的内容最终将集中到 config-map.yml 并经由集群的 deployment 被 mount 到 config.toml 文件,以方便地应用到所部署的 gitlab-runner pod 中。
◇ 未来由 gitlab-runner 拉起的 kubernetes executor 类型 pod 的配置也在这个 config.toml 文件里的,部分配置也会被 mount 成 pod 中的文件。
◇ 以下配置内容和命令中的所有由"${}"包裹的变量都需要替换成实际值。
secret
◆ 通过 secret 存放 kubernetes 集群、docker registry、git ssh 的鉴权信息。
◆ 修改样例 secret.yaml 配置,其中的 ca.crt、tls.crt、tls.key 依次填写集群连接信息里的 certificate-authority-data、client-certificate-data、client-key-data。
◆ 执行"kubectl apply -f secret.yaml"使生效。secret.yaml 完整内容如下:
1
2
3
4
5
6
7
8
9
| apiVersion: v1
kind: Secret
metadata:
name: gitlab-runner-secret
type: kubernetes.io/tls
data:
ca.crt: ${ca.crt}
tls.crt: ${tls.crt}
tls.key: ${tls.key}
|
◆ 如果 gitlab 的 pipeline 任务需要推送 docker 镜像到镜像仓库,则在集群创建名为"registry-auth-secret"的 secret,执行如下命令:
1
| kubectl create secret docker-registry registry-auth-secret --docker-server=${registry-server-hostname} --docker-username=${username} --docker-password=${password}
|
◆ 如果 gitlab 的 pipeline 任务需要 clone 其他 git 仓库,则在集群创建名为"gitlab-credentials"的 secret,执行如下命令:
1
| kubectl create secret generic gitlab-credentials --from-file=id_rsa=${pathto_id_rsa} --from-file=id_rsa.pub=${pathto_id_rsa.pub} --from-file=known_hosts=${pathto_known_hosts}
|
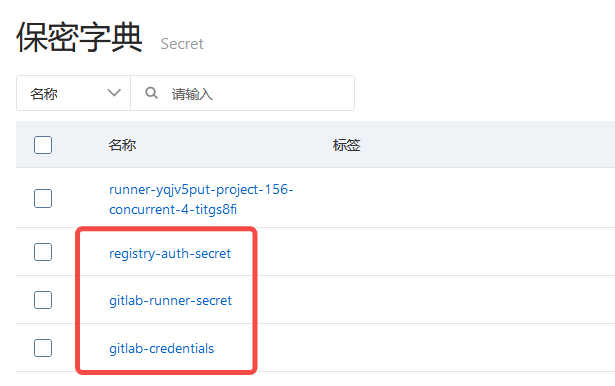
◆ secret 创建成功后可在"阿里云工作台页面集群详情->配置管理->保密字典"位置看到。
配置 cache
● gitlab 的 cache 用于让 executor 缓存文件与文件夹以减少重复的下载、安装等工作。
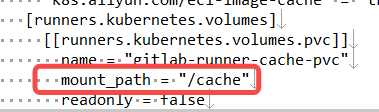
● executor 容器的 cache 存储到的默认路径是"/cache",样例已经在 config-map.yaml 中将 pvc 配置到了此路径。
● 准备好 NAS(Network Attached Storage) 盘,将其地址与缓存文件夹根目录(此处定义为/gitlab-runner-cache)填写到 nas-pv.yaml。nas-pv.yaml 完整内容如下:
1
2
3
4
5
6
7
8
9
10
11
12
13
14
15
16
17
18
19
20
| apiVersion: v1
kind: PersistentVolume
metadata:
name: gitlab-runner-cache-pv
spec:
accessModes:
- ReadWriteOnce
capacity:
storage: 10Gi
mountOptions:
- nolock,noresvport,noacl,hard
- vers=3
- rsize=1048576
- wsize=1048576
- proto=tcp
- timeo=600
- retrans=2
nfs:
path: /gitlab-runner-cache
server: ${nas-server}
|
● 相应的 nas-pvc.yaml 直接使用样例的即可。nas-pvc.yaml 完整内容如下:
1
2
3
4
5
6
7
8
9
10
11
| apiVersion: v1
kind: PersistentVolumeClaim
metadata:
name: gitlab-runner-cache-pvc
spec:
accessModes:
- ReadWriteOnce
resources:
requests:
storage: 10Gi
volumeName: gitlab-runner-cache-pv
|
● 分别执行"kubectl apply -f nas-pv.yaml"和"kubectl apply -f nas-pvc.yaml"使生效。
◆ pv 与 pvc 创建成功后可分别在"阿里云工作台页面集群详情->存储->存储卷|存储声明"位置看到。
配置 image-cache
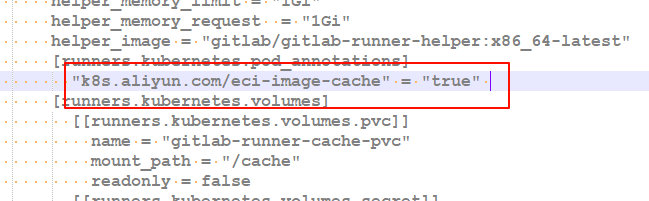
○ imagecache-crd(Custom Resource Definition,CRD)是用于实现镜像缓存的 kubernetes 控制器,样例在 config-map.yaml 和 gitlab-runner-deployment.yaml 中通过 k8s.aliyun.com/eci-image-cache 这个自定义注解标识了对 imagecache 的启用。
○ 通过"kubectl get crd"命令查看 imagecache-crd 是否已安装。如果未安装则通过"kubectl apply -f imagecache-crd.yaml"安装。直接使用样例的 imagecache-crd.yaml 即可,完整内容如下:
1
2
3
4
5
6
7
8
9
10
11
12
13
14
15
16
17
18
19
20
21
22
23
24
25
26
27
28
29
30
31
32
33
34
35
36
37
38
39
40
41
42
43
44
45
46
47
48
49
50
51
| apiVersion: apiextensions.k8s.io/v1beta1
kind: CustomResourceDefinition
metadata:
name: imagecaches.eci.alibabacloud.com
spec:
group: eci.alibabacloud.com
version: v1
names:
kind: ImageCache
plural: imagecaches
shortNames:
- ic
categories:
- all
scope: Cluster
subresources:
status: {}
validation:
openAPIV3Schema:
required:
- spec
properties:
spec:
type: object
required:
- images
properties:
imagePullSecrets:
type: array
items:
type: string
images:
minItems: 1
type: array
items:
type: string
imageCacheSize:
type: integer
additionalPrinterColumns:
- name: Age
type: date
JSONPath: .metadata.creationTimestamp
- name: CacheId
type: string
JSONPath: .status.imageCacheId
- name: Phase
type: string
JSONPath: .status.phase
- name: Progress
type: string
JSONPath: .status.progress
|
○ 根据实际需要将待缓存的 docker 镜像名填写到 imagecache.yaml 中,我使用的 imagecache.yaml 完整内容如下:
1
2
3
4
5
6
7
8
9
10
11
12
| apiVersion: eci.alibabacloud.com/v1
kind: ImageCache
metadata:
name: gitlab-runner
spec:
images:
- gitlab/gitlab-runner-helper:x86_64-latest
- gitlab/gitlab-runner:latest
- node:20-alpine
- node:20
- mcr.microsoft.com/playwright:v1.44.0-jammy
- gcr.io/kaniko-project/executor:v1.14.0-debug
|
○ 执行"kubectl apply -f imagecache.yaml"使生效。
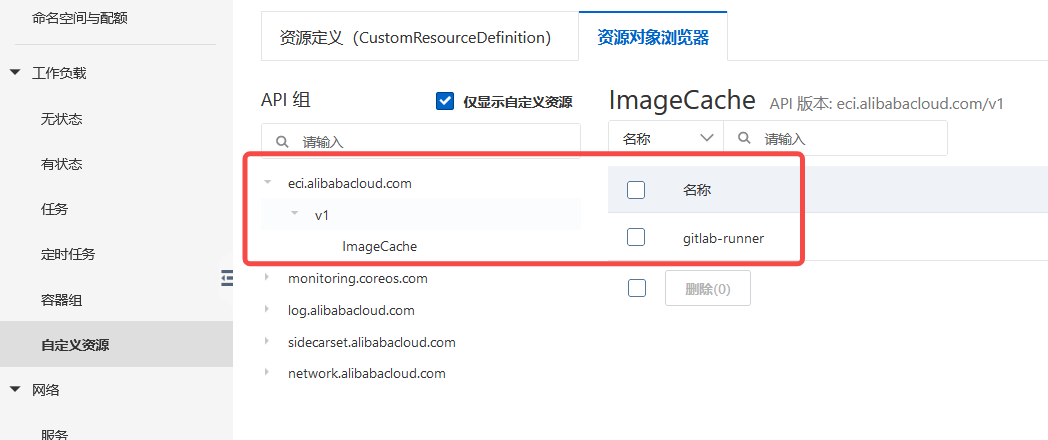
○ imagecache 创建成功后可在"阿里云工作台页面集群详情->工作负载->自定义资源->资源对象浏览器"位置看到。
配置 ConfigMap
◇ gitlab-runner 的配置文件在容器虚拟机的默认位置是"/etc/gitlab-runner/config.toml",样例已经在 gitlab-runner-deployment.yaml 中将 configMap 的 mountPath 配置到了/etc/gitlab-runner。
◇ 参照gitlab 文档得到 authentication token(注意不能是 registration token)填写到 config-map.yaml。
◇ 将私有 gitlab 网站与 kubernetes 集群的连接信息填写到 config-map.yaml 文件样例。其中 concurrent 控制支持同时执行任务的数量,由于 Serverless 特性可以认为不受限制。然后 executor 的 cpu 与内存配置通过 cpu_limit、cpu_request、memory_limit、memory_request 控制。
◇ config.toml 中有关 [runners.kubernetes] 配置项的说明也在gitlab 文档。
◇ config-map.yaml 完整内容如下。
1
2
3
4
5
6
7
8
9
10
11
12
13
14
15
16
17
18
19
20
21
22
23
24
25
26
27
28
29
30
31
32
33
34
35
36
37
38
39
40
41
42
43
44
45
46
47
| apiVersion: v1
kind: ConfigMap
metadata:
name: gitlab-runner-config
data:
config.toml: |
concurrent = 10
check_interval = 0
[[runners]]
name = "runner-on-k8s"
url = ${gitlab-url}
token = ${authentication token}
executor = "kubernetes"
output_limit = 51200
[runners.kubernetes]
host = ${k8s-connect-url}
cert_file = "/etc/gitlab-runner/tls.crt"
key_file = "/etc/gitlab-runner/tls.key"
ca_file = "/etc/gitlab-runner/ca.crt"
namespace = "default"
pull_policy = "if-not-present"
cpu_limit = "2"
cpu_request = "2"
memory_limit = "4Gi"
memory_request = "4Gi"
helper_cpu_limit = "0.5"
helper_cpu_request = "0.5"
helper_memory_limit = "1Gi"
helper_memory_request = "1Gi"
helper_image = "gitlab/gitlab-runner-helper:x86_64-latest"
[runners.kubernetes.pod_annotations]
"k8s.aliyun.com/eci-image-cache" = "true"
[runners.kubernetes.volumes]
[[runners.kubernetes.volumes.pvc]]
name = "gitlab-runner-cache-pvc"
mount_path = "/cache"
readonly = false
[[runners.kubernetes.volumes.secret]]
name = "registry-auth-secret"
mount_path = "/kaniko/.docker"
read_only = true
[runners.kubernetes.volumes.secret.items]
".dockerconfigjson" = "config.json"
[[runners.kubernetes.volumes.secret]]
name = "gitlab-credentials"
mount_path = "/root/gitlab-credentials"
read_only = true
|
◇ 执行"kubectl apply -f config-map.yaml"使生效。
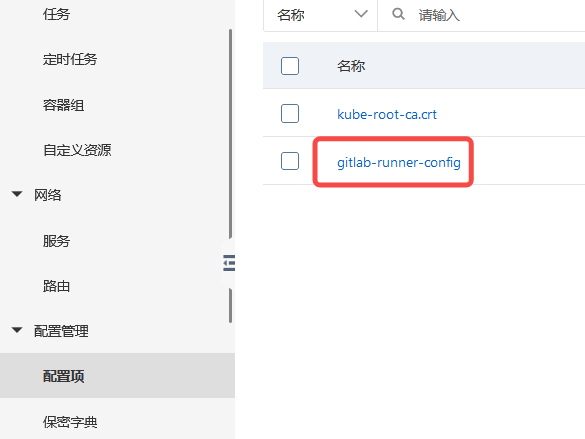
◇ ConfigMap 创建成功后可在"阿里云工作台页面集群详情->配置管理->配置项"位置看到。
使用 deployment 部署 gitlab-runner 集群
◆ 用于部署集群的 deployment 直接使用样例的 gitlab-runner-deployment.yaml 即可,完整内容如下:
1
2
3
4
5
6
7
8
9
10
11
12
13
14
15
16
17
18
19
20
21
22
23
24
25
26
27
28
29
30
31
32
33
34
35
36
37
38
39
40
41
| apiVersion: apps/v1
kind: Deployment
metadata:
name: gitlab-runner
spec:
selector:
matchLabels:
app: gitlab-runner
template:
metadata:
labels:
app: gitlab-runner
annotations:
k8s.aliyun.com/eci-image-cache: "true"
spec:
containers:
- image: gitlab/gitlab-runner:latest
imagePullPolicy: IfNotPresent
name: gitlab-runner
volumeMounts:
- mountPath: /etc/gitlab-runner
name: config
volumes:
- name: config
projected:
defaultMode: 420
sources:
- secret:
items:
- key: ca.crt
path: ca.crt
- key: tls.crt
path: tls.crt
- key: tls.key
path: tls.key
name: gitlab-runner-secret
- configMap:
items:
- key: config.toml
path: config.toml
name: gitlab-runner-config
|
◆ 执行"kubectl apply -f gitlab-runner-deployment.yaml"完成 gitlab-runner 的部署。
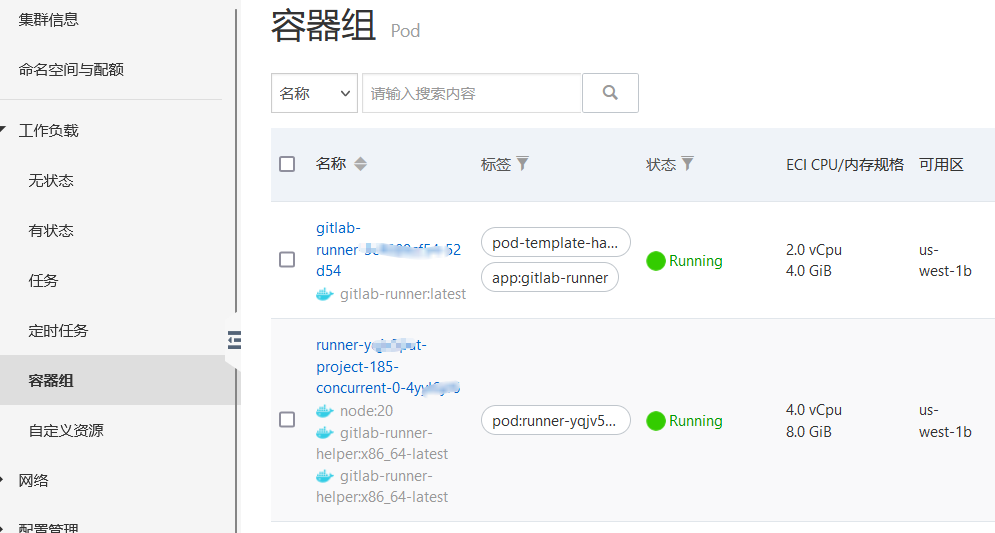
◆ 部署成功后可在"阿里云工作台页面集群详情->工作负载->容器组"位置看到 gitlab-runner 的 pod。接下来在私有 gitlab 网站配置好 runner,当有 pipeline 任务执行时也可以看到相应 executor 的 pod。
配置 gitlab pipeline 中的相关问题与处理
artifacts 与 cache
♂ artifacts 与 cache 的区别在 gitlab 文档(https://docs.gitlab.com/ee/ci/caching/#how-cache-is-different-from-artifacts)里有说明。
♂ 当前 gitlab-runner 的方案中,考虑到 artifacts 存储位置是 gitlab 所在远程主机,而 cache 存储位置在每个 executor 的本地磁盘(通过将 NAS 挂载到每个 executor 上实现了 cache 内容的共享),特别当需缓存内容比较大的时候,使用 cache 优于 artifacts。
♂ cache 没有 artifacts 那样的自动过期删除机制,对于打包结果这种每次存储路径不同的 cache,可在 after_script 阶段增加脚本以针对 cache key 清理不再使用的 cache 内容。示例:
1
2
3
4
5
6
7
8
9
10
11
12
13
14
15
16
17
18
19
20
21
22
23
24
25
26
27
28
29
30
31
32
| .dist-cache: &dist-cache
key: $CI_PIPELINE_ID
paths:
- ./dist
stages:
- build
- deploy
build-job:
stage: build
script:
- echo 'build';
cache:
- <<: *dist-cache
policy: pull-push
allow_failure: false
deploy-job:
stage: deploy
image:
name: gcr.io/kaniko-project/executor:v1.14.0-debug
entrypoint: ['']
script:
- echo 'build and push docker image based on cache';
after_script:
- rm -rf /cache/$CI_PROJECT_NAMESPACE/$CI_PROJECT_NAME/$CI_PIPELINE_ID*;
cache:
- <<: *dist-cache
policy: pull
dependencies: [build-job]
|
build docker 镜像
♀ 对于 docker 镜像的构建与推送,采用配置更简单的 kaniko 方式,根据参考文档[3],已经在之前 ConfigMap 中配置 docker 仓库 secret 的 mountPath 到"/kaniko/.docker/config.json"。
♀ kaniko 镜像是个特别精简的 linux,不适合在其中配置打包环境。于是将打包与 docker 操作拆分到不同 job,打包结果通过上步 cache 的方式共享到 kaniko 镜像对应的容器中。
♀ 使用 kaniko 的 deploy-job 的示例:
1
2
3
4
5
6
7
8
9
10
11
12
13
14
15
16
17
18
19
20
21
| .echo-variables: &echo-variables
- echo "CI_PIPELINE_ID:" $CI_PIPELINE_ID;
deploy-job:
stage: deploy
image:
name: gcr.io/kaniko-project/executor:v1.14.0-debug
entrypoint: ['']
script:
- /kaniko/executor
--context "${CI_PROJECT_DIR}"
--dockerfile "./Dockerfile"
--destination "${registry_dist}"
before_script:
- *echo-variables
after_script:
- rm -rf /cache/$CI_PROJECT_NAMESPACE/$CI_PROJECT_NAME/$CI_PIPELINE_ID*;
cache:
- <<: *dist-cache
policy: pull
dependencies: [build-job]
|
git ssh 鉴权
▲ git ssh 信息的 mountPath 直接指定到"/root/.ssh"的时候遇到了如下问题:
(1)gitlab-runner 的 config.toml 配置中[runners.kubernetes.volumes.secret]不支持指定 mout 文件的 mode,使用 id_rsa 文件做 ssh 鉴权会报错:"Permissions 0644 for '/root/.ssh/id_rsa' are too open. This private key will be ignored"。
(2)即使将配置中[runners.kubernetes.volumes.secret]的 read_only 设置为 false,对 id_rsa 执行 chmod 操作也报错"chmod: changing permissions of '/root/.ssh/id_rsa': Read-only file system"。
▲ 于是在 ConfigMap 中将 mountPath 指定到了"/root/gitlab-credentials",之后在 pipeline 里再将文件从"/root/gitlab-credentials"拷贝到"/root/.ssh"并设置文件 mode。
▲ 如下示例定义一个初始化 git 鉴权文件的锚点供需要时引用。
1
2
3
4
5
6
| .prepare-git: &prepare-git
- set +e;cat /root/.ssh/known_hosts;if [[ $? -ne 0 ]]; then
mkdir /root/.ssh;cat /root/gitlab-credentials/id_rsa > /root/.ssh/id_rsa;chmod 400 /root/.ssh/id_rsa;
cp /root/gitlab-credentials/id_rsa.pub /root/gitlab-credentials/known_hosts /root/.ssh/;
fi;set -e;
- ssh -T git@${git_domain}
|
参考文档
- 从零入门 Serverless | 教你 7 步快速构建 GitLab 持续集成环境
- gitlab 官方 doc
- kubernetes executor 上支持 docker 命令